Guitar Technique Warm Up
Today’s lesson completes the series of lessons on creating your own perfect guitar warm up regime. In lesson one I concentrated on building dexterity and co-ordination, and in the previous lesson, I showed you some common melodic patterns and sequences to help you warm up and develop new ideas. Now that you have built dexterity and patterns it is time to warm up your sliding, bending, vibrato and legato.
Guitar Technique Example 1 – Steve Vai Style Upwards Slides
Example one demonstrates a warm up that Steve Vai uses when preparing to play live. The idea is to slide an octave on the ‘G’ string and repeat that octave slide with all four different fingers. Sliding an octave accurately is not the easiest thing to do, so focus your eye on the fret you are sliding to and be sure that you are not pushing too hard into the strings when you slide. In time, you will have played the technique so many times that you can complete the slide without visual aids. Using octave slides is also a creative way to write new licks and phrases.
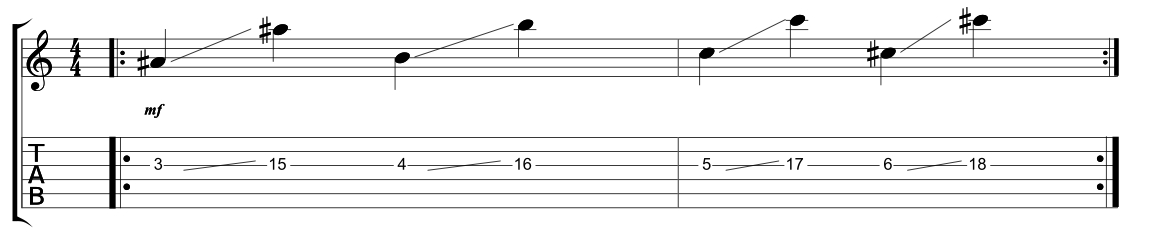
Guitar Technique Example 2 – Steve Vai Style Downwards Slides
Example two is the complete reverse of example one. Sliding down an octave feels slightly more tricky than sliding upwards. Once again focus your eyes on where you are sliding to and don’t add too much pressure to the slide.

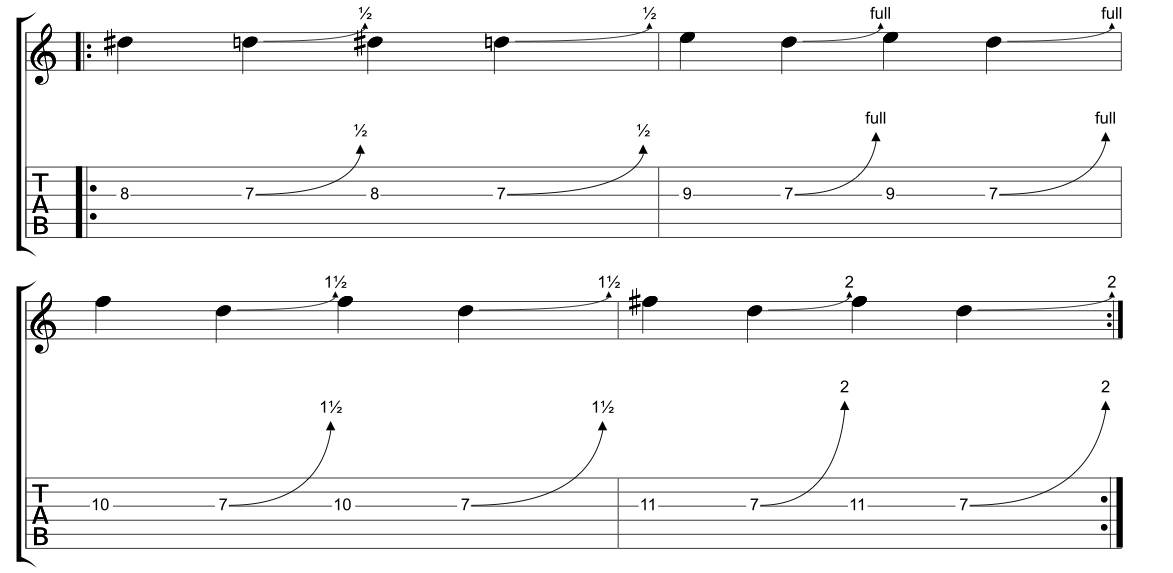
Guitar Technique Example 3 – Bending
Bending is one of the essential things to warm up! There is nothing worse than hearing out of tune bends, so in this example, I have put together four common bends into a neat, concise exercise. To practice bending in tune I recommend picking the fret you are bending to and listening to the note before attempting a bend of any size. The two-tone bend in bar four is particularly challenging. I recommend using a light string gauge (perhaps 9’s – 42’s) when attempting a bend of this magnitude.
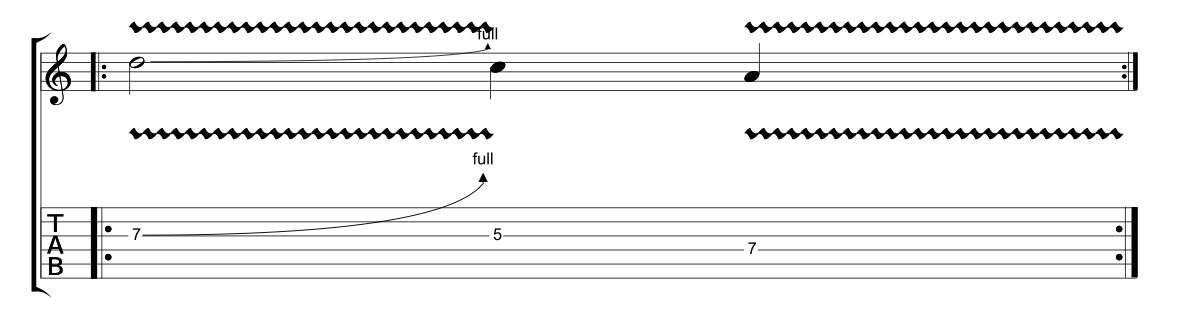
Guitar Technique Example 4 – Vibrato
I have noticed over many years of teaching and playing, that the thing that sounds terrible when not warmed up is vibrato. Example four aims to rectify this by practicing your vibrato on all fingers. In reality, you will rarely (if ever in a rock context) need to use modern rock style vibrato on your fourth finger, but I have included it to complete the idea.

Guitar Technique Example 5 – Bend Vibrato
Following on from example four, I wanted to include a bend vibrato warm up lick. Although I have created a very simple A minor pentatonic lick, your focus should be on adding vibrato to the initial bend. Only add the vibrato after the pitch of the bend has reached its peak. As this technique is very difficult to explain, refer to how I approach this in the video above.
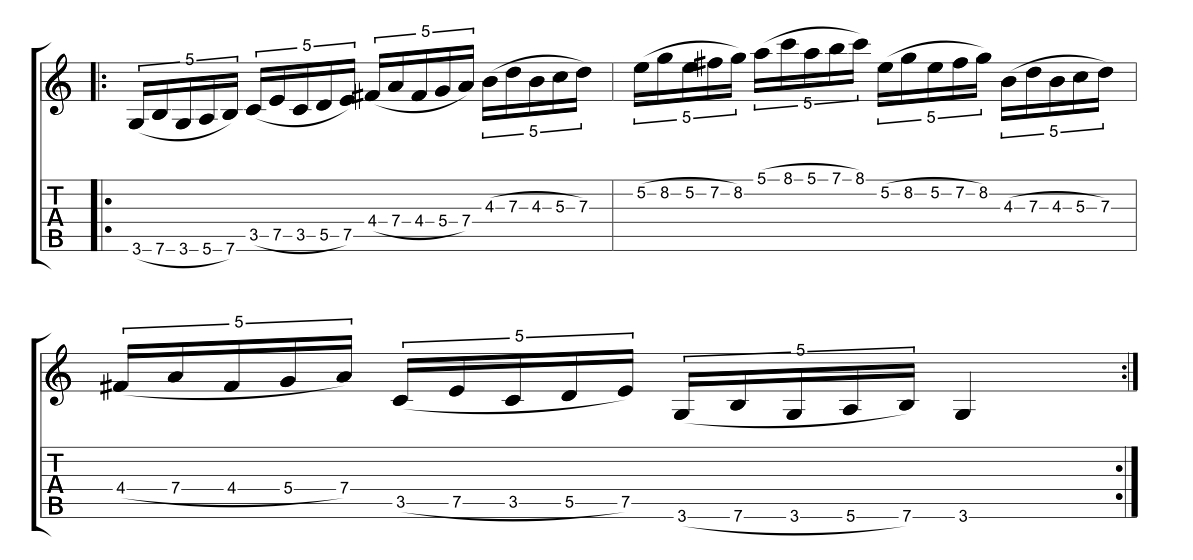
Guitar Technique Example 6 – Legato Pentatonic 5 Note Groups
I have linked hammer-ons and pull-offs together in the next two examples. Example six uses the A minor pentatonic scale in position one and uses groupings of five notes. Use any five syllable word to help you count the quintuplets, I favour ‘u-ni-ver-si-ty’. Eric Johnson is a huge fan of creating long pentatonic runs using groupings of five notes, so not only is this a fantastic warm up, but it is also a tasty lick builder!

Guitar Technique Example 7 – G Major Scale 5 Note Groups
In article two I demonstrated a simple legato pattern using the G major scale three note per string pattern. I wanted to extend on that shape and create a slightly more challenging legato warm up to finish this series. In a similar way to example 6, example 7 uses five note groupings but applies them to the major scale shape. Watch the video carefully as I explain how the pattern works and how to use it.
Recommended listening
A lot of guitarists use melodic patterns but I first got into developing this technique by watching Steve Vai. I recommend buying the album “Passion And Warfare.” My favourite track on that album being “For The Love Of God”
Subscribe on Youtube
Make sure you log on and subscribe to our new YouTube Channel, dedicated to bringing you the finest free guitar lessons.
Guitar Lesson Video Transcription
Hey YouTube, Simon here once again for – that’s right, you guessed it – the incredible Fundamental Changes. Today we’re looking at part 3 in my final part of the Developing Your Perfect Warm up Regime, looking at some ideas to get your techniques flowing freely before you start to play. Let’s go and have a look at some examples of that just after this.
In part 1 of this series we looked at dexterity exercises to get your fingers moving well, to develop your coordination, and to build on things. In the last lesson, we looked at building melodic sequences – so taking scales, arpeggios, moving 4-finger chords, and finding other ways to develop your own warm up. Today the final part of this little series, I wanted to talk about warming up your techniques. Now, obviously that’s an enormous topic in itself, but I’ve tried to put together today here some examples that will get your techniques warm quickly. Let’s have a look at Example 1 that uses sliding in the style of Steve Vai warm up.
[guitar playing]
That was the upward sliding example in the style of Steve Vai. Steve uses this as a warm up before he goes into a session, or to perform live. Basically what you’re going to do is to start on the 3rd fret of the G, or the 3rd string with your 1st finger, and you’re going to pick that note and you’re going to slide all the way up to the 15th fret, or a complete octave (or an octave). Then you come all the way back down to the 4th fret on your 2nd finger, and then you go up an octave to 16; 3rd finger, up an octave; Little finger, up an octave. Not only does this work on you sliding an enormous distance on the guitar, it’s very rare that you slide an octave. Normally we slide 1, 2, 3 frets quite closely there. It also makes sure you can perfectly work your slide on all your fingers. Often I find with students, they’re fine sliding on the 1st, 2nd, and 3rd, and sometimes they’ve never had to slide on their 4th. Now the reason for that, it’s probably not as commonly – you’re not going to come across it so often. However, it’s good with your technique warm up as to cover every eventuality. There’s a cool little warm up there, sliding an octave on all 4 fingers. Let’s have a look at the next example.
[guitar playing]
Example 2 is the exact reverse of example 1. We’re starting up high around the 18th fret on the G string, and you’re going to start on your 1st finger, slide down an octave; Next fret along, 17, down an octave on your second finger; Next fret, boomph. Exactly the reverse of what you did in example 1. It’s really important to be able to do things in both directions. Let’s look at the next example.
[guitar playing]
Bending in tune is a classic problem, and it’s something that we all can warm up before we get into our playing. In example 3 here today, I developed a little 4-bar example that uses 4 types of bends. Semitone or 1 fret; tone or 2 fret; tone and a half or 3 fret;2-tone or 4 fret. Now, some of you might find the 2-tone bend – I call it the Dave Gilmour bend -pretty tough. If you are finding it really tough, make sure you’re using fairly light string gauges; say 9 to 42s or something like that. If you’re still finding it tough, don’t worry, do the first 1 or 2 bars of this, or 3 bars, and then build it up as your strength gets bigger and bigger. What you want to do here is you’re picking the note you’re bending to first. As you see in the tab in the notation in the article below this, you’re going to pick the 8th fret on the G, bend the 7th to it. Pick the 9th, bend the 7th, up, now a tone. Pick the 10th, bend the 7th, tone and a half. Pick the 11th, monster bend –epic- bend it all the way up. What that’s doing is training the ear where you’re trying to bend. That’s the note I’m aiming for, now I’m going to bend to it. What I’m aiming for, bend to it. Over time, what will happen is you will just get the exact strength needed for each bend. Your ear will know instinctively what you’re going to bend to. When you’re warming up these big techniques, make sure that you have a note that you refer in your ear to. Your ear and your brain are more important than your eyes and your fingers when you’re making music. Let’s move on to the next example.
[guitar playing]
Vibrato is a notorious challenge when we are playing in general. Something I’ve found is when some people, including myself, are not fully warmed up or they are nervous, their vibrato tends to either go really wobbly or tiny. What you want and try to do is – it’s not easy to practice with a metronome, but what you want to do is set it quite slow, I did all these examples today around 70-80 bpm. You want to manipulate the string, and again I’ve done it on all fingers 5, 6th, 7th, and 8th frets. Again, I never really use vibrato with my little finger ever, but for the purposes of consistency I’ve done it on all fingers today. Keep it wide, keep the string moving around the note that you are manipulating – like a bend, but you are manipulating the note. This is a modern rock vibrato. Obviously you could practice this with a classical vibrato that moves along the fret as opposed to manipulating the strings. For this lesson we’re talking quite a rocky vibrato. Let’s head on.
[guitar playing]
The second vibrato example is bending vibrato. When you bend a note, you want to bend up to the pitch that you require, however far that is from the original note that you picked, bend up to that pitch so you can hear that note, and then add the vibrato afterwards. Lots of times, players might bend up and they’re wobbling the string, but your ear can’t tell where you’re bending to there. It can sound a little bit sloppy. In this example, we’re going to bend the 7th fret of the G string, the 3rd string up a tone, then we’re going to add on a vibrato, and then we’re just going to finish it off with a simple blues lick 5th fret of the same string, and then the root note of a little A blues lick. Bend vibrato, quite a cool thing warm up.
[guitar playing]
The final 2 examples are legato based using hammer-on, some pull-off type techniques. This one is an A minor pentatonic scale, our favorite friend in position or shape 1, and you’re coming down the string in groupings of 5s. You’re going to play from the top note of the scale, 8th fret, 5 notes, 1-2-3-4-5, then start from the second note that you played, the A on the top string there 1-2-3-4-5; 3rd note 1-2-3-4-5, 1-2-3-4-5, 1-2-3-4-5. Now, this is an Eric Johnson style pattern, a lot of guys do it. Bonamassa, Johnson, tons of guys, but it can be, as well as a good warm up, a fantastic tasty lick builder. I personally count groupings of 5, u-ni-ver-si-ty, but you could use any 5-syllable words. If you’ve got your metronome going on, u-ni-ver-si-ty, u-ni-ver-si-ty, u-ni-ver-si-ty, u-ni-ver-si-ty, or any 5-syllable word you really like. That helps me to count over a metronome when I’m playing groupings of 5.
[guitar playing]
The last example of part 2 of this last time showed you the G major scale, 3 notes per string. For any of you that didn’t see that lesson, we’re going to have 3-5-7, 3-5-7, 4-5-7, 4-5-7, 5-7-8, and 5-7-8. What I’ve done here today is that I’ve done another grouping of 5-pattern, but using a slightly more modern day rock vibrato pattern. Some guys like Satriani and Vai would use this sort of thing. So the grouping of 5, you’re going to play the lowest note that you can, top note that you can play, back to the lowest note, middle note, top note. Low-high-low-middle-high. The reason why I’m saying it like that is because they change what finger grouping they are depending on what strings you are. The 3-5-7 grouping is going to be 1st, 4th, 1st, 2nd, 4th, same on the string below it because they do the patterns 2 strings at a time. The 4-5-7,1st-4th-1st-2nd-4th. Again, but this time we’re not spacing it out in the same way, and then the 5-7-8 on the B in the high E strings, 1st little, or 4th-1st-3rd-4th. That’s how you get that 1-2-3-4-5, 1-2-3-4-5, u-ni-ver-si-ty, u-ni-ver-si-ty,u-ni-ver-si-ty, u-ni-ver-si-ty, and a cool little rock warm up there.
What you need to do is develop your own regime. These are just a few of my ideas over the last parts: Pick 1 or 2 from dexterity; 1 or 2 from the melodic sequences; and 1 or 2 from this one that you use, and have a 5 or 6 grouping that you can change constantly. You might have enjoyed the Satriani spider from the first one, and you might have enjoyed the 4-finger chord change from the part 2, and the bending from this one. It doesn’t matter how many you do, it’s just about building a concise warm up and what works for you.And working, almost like going to the finger gym. It takes practice, but it will develop your speed, your technique, your accuracy, and your muscle memory as well.
For any questions, hit me down below, and I’ll see you next time for way more free videos. Take care.
Hi everyone thanks for watching this technique warm up lesson. I really hope you got something from it. Click subscribe underneath here, because Joseph and I bring you videos every week to inspire you in your playing. Take care, see you next time.