Master the CAGED System for Guitar
The guitar is unique amongst instruments in that it isn’t linear. Imagine a keyboard; the notes go in one direction and there is only one way to play each pitch. When you compare that with the guitar, you will notice that we have more than one way to play most pitches, and that the notes move both horizontally and vertically across the neck.
What we need is a simple way to make sense of all this information; a way to organise the neck into convenient chunks to remove confusion and help us venture into areas that we might not be confident to explore.
The more of the neck we know, the more creative, expressive and musical we can be, and the more satisfied with our playing we will feel.
This is where the CAGED system for Guitar comes in.
The CAGED system divides the guitar neck into manageable chunks based around five different chord shapes – the chord shape of C, the chord shape of A, and the chord shapes of G, E and D.
Look at these barre chord shapes. See if you recognise the open position chords that you probably learned as a beginner. The square dots are the root notes and each chord has been shown here as a voicing of A Major:
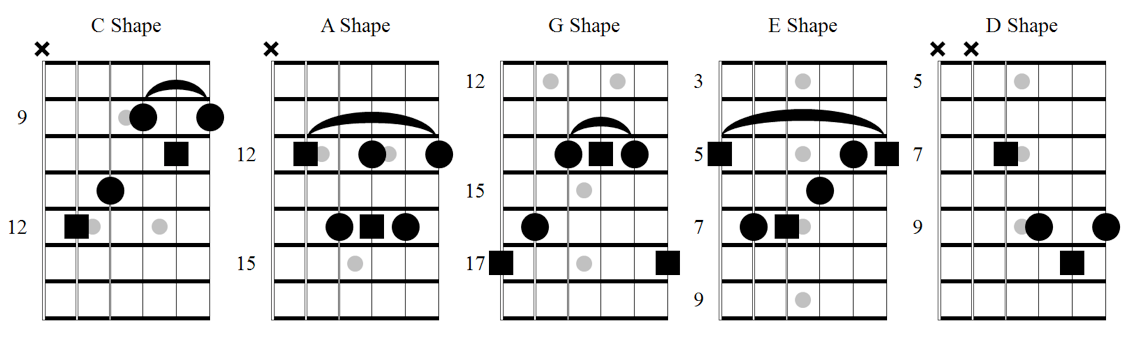
We use these chord shapes to divide up the neck when we solo. What you are going to learn is how to hang scale shapes and licks off each chord shape. This does take time, but it will never leave you.
It’s like “Seeing the Matrix”
Using each of these shapes we can section off the neck; one shape for one position.
For the moment, let us work in one key, the key of A. Here are all the chords above shown as different voicings of an A Major chord spread out on the neck.
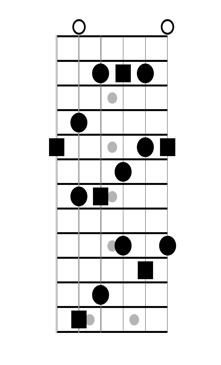
At first glance this may look confusing, but look again carefully. Can you see all the barre chord shapes from the previous page on the neck diagram above? Use the square root notes to help you orientate yourself.
Why is the CAGED system for Guitar Important?
This concept is vital to our ability to solo in any position. For example, if I’m in the key of A Major and my left hand is located in the 9th-12th fret area, I will be visualising the ‘C’ Shape. If I want to play in the 3rd to 5th fret range, I see a ‘G’ Shape. I have many licks and lines in my head that I visualise around each chord shape so wherever I am on the guitar, I always have something to play!
The real trick to all this is being able to see clearly all the root notes for the key we are playing in. Root notes in this book will always be shown as a square dot in any diagram.
You should now understand that
• Guitarists have five chord shapes that separate the neck into five individual areas.
• We use these shapes as visual aid to help us navigate around the fretboard.
• We will learn our scales and licks in conjunction with each chord shape.
When we visualise each chord on the neck, we will immediately have the vocabulary to play in each position.
That is the beauty of the CAGED system. In the next lesson we will learn to ‘hang’ scales off each CAGED chord shape so that when you see the chord shape, you see all the licks you know.
The chords I have shown above are all, for the moment, major chords. We would visualise them if we were playing major scales and licks:
If we are soloing with major scales, we use major chords.
If we are soloing using minor scales, we use minor chords.
If we are soloing with dominant 7 scales, we use dominant 7 chords.
The CAGED System with The Major Pentatonic Scale
Now you know your CAGED system Major chords, the next stage it to attach or ‘layer’ on to them a useful scale. In this case, let’s learn the Major Pentatonic scale around each of the scale shapes above.
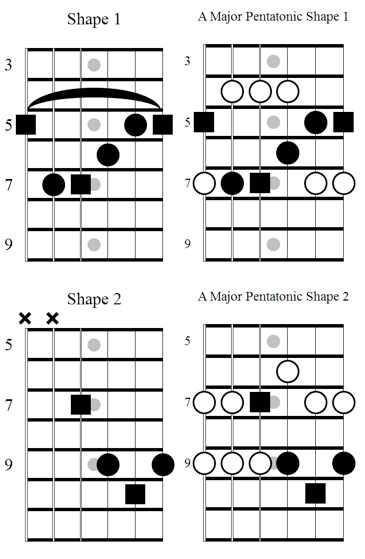
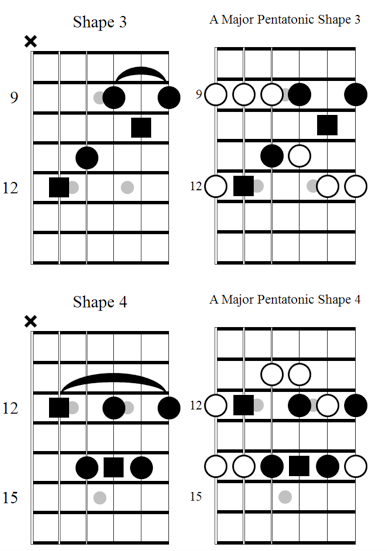

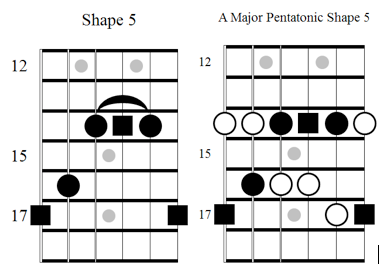
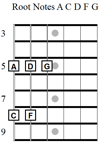
All the above scales are in the Key of A, spread out on the neck Here’s the exercise: Play through the key centers of A, C, D F and G in one position of the neck, we’ll start in the 5th – 8th fret position. You have to translate the appropriate chord shape so that it’s root lines up with the root of the key centre we’re trying to play. For example, for ‘F’ You would use the ‘C’ shape chord with the root on the 8th fret. Here are the roots of the key centers in the 5th -8th position:
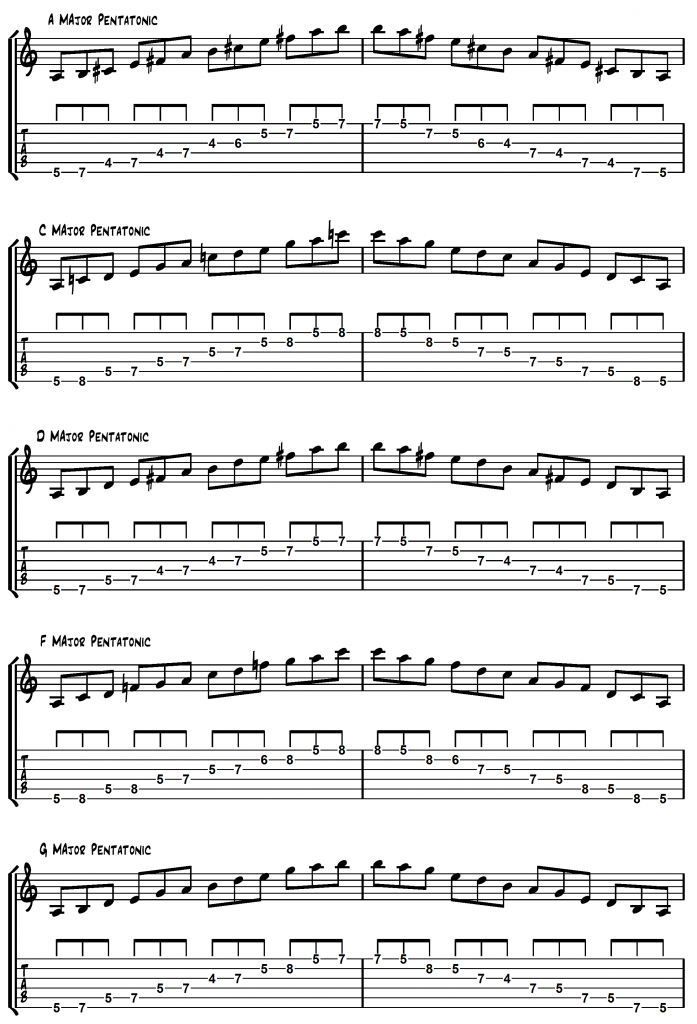
First; play the chord associated with each scale shape, and then run up and down the scale from the lowest to the highest note and back. When you’re comfortable with that, play through the same key centers but don’t play each chord first e.g, ascend and descend each major pentatonic scale in the order A, C, D, F and then G with no gaps. This works best as a triplet exercise and is shown in the following example:
 Memorising these scale shapes around each chord will take some time, but as I’m sure you can see, the ability to play any scale in any key in any position by simply building the scale around a chord shape anchor is incredibly powerful.
The next stage is to learn a few licks to use instead of playing up and down scales, and you’ll instantly be able to solo anywhere on the guitar! Plus…. you’ll never forget a lick as you’ve built it around a handy chord shape anchor!
There are 100 CAGED blues guitar licks in by book The CAGED system and 100 Licks for Blues Guitar It is important to visualize the chord shape as you play this idea to the point that when you play the chord you can visualize the notes of the scale all around it. It’s then simply a case of knowing where all your licks start in relation to your chord ‘anchor’ and you have instant fretboard freedom.
![]()