How To Practice Jazz Guitar Blues – Wes Montgomery Guitar Blues Case Study
Many guitarists aspire to learn jazz guitar blues, but get frustrated with their lack of progress. In this guest post, Greg O’Rourke from fretdojo.com teaches you the essential ingredients you need for a successful jazz guitar practice session, walking you through a Wes Montgomery guitar blues as an example.
Are you confused about how to actually practice jazz guitar?
Look:
You’re not alone – how to practice jazz guitar is widely misunderstood.
An ineffective practice routine will kill your enthusiasm for jazz guitar blues. So, it’s important that you work out how to practice in a way that will get you the results you want – without having to spend too long getting there.
By the way, I know how frustrating learning jazz guitar can be.
Arpeggios, licks, comping, soloing…there seems to be so many directions to go in during your practice session; it’s hard to know how to put it all together to make great music.
Well, look no further.
In this lesson, you’ll learn a step-by-step guide on how to play a jazz tune with confidence.
You’ll discover how to go from not knowing a chart at all, all the way to being able to improvise in the style of your favorite jazz musician.
For this case study, you’re going to tackle a jazz guitar blues, one of the most common song forms that’s called at jazz jam sessions and gigs.
The player we’re going to study? He needs no introduction…
I couldn’t think of a better guitarist for this article than Wes Montgomery, one of the greatest jazz guitar masters of all time – come on, everyone wants to play jazz guitar like Wes!
You’re going to delve into some classic Wes Montgomery guitar blues approaches and learn ways to incorporate his lines into your playing.
Are you excited yet?
Good! Let’s get into it.
Tips for Learning Jazz Guitar Blues
Let’s get something straight.
If you’re only going to get one thing out of this article, it should be this:
Focus your practice on ONE tune at a time.
Apply all the arpeggios, scales, and licks that you practice to a single tune in an integrated way to build your repertoire.
This way, all the elements that you’re practicing ‘feed’ off one another and help you learn everything faster.
This also stops the following problem from happening:
Sure, you might do a lot of practice, you know a bunch of scales and licks and you understand jazz harmony well enough.
But if you’re asked to play off the cuff, do you actually have a tune under your fingers? This is where many aspiring jazz students get caught out.
Can you relate to this?
This is why it’s important to make repertoire building the primary purpose of your jazz guitar practice.
By directing all your energy into learning scales, arpeggios, comping and licks on just one tune at a time, you’ll have a secure basis for playing a solid set list anywhere, anytime.
Aside from that, here are some other important tips you should keep in mind:
- Learn as much as you can by ear: Jazz is an oral tradition. Real Book charts are just a guide: you really should have the music in your ears, rather than in your eyes.
- Sing everything you practice! Singing is the bridge between your mind and your fingers.
- Memorize everything as soon as possible: Once you know a chart you should avoid reading anything at all. Like singing, this will help with your ear training.
- Record yourself: This is so important as a self-assessment tool. By listening back to your own playing you’ll quickly be able to assess what needs improvement.
Let’s now cover the process I use to learning a new tune, step by step.
Step 1: Listen to a Bunch of Recordings and Choose One To Work With
For a jazz blues, this is tricky.
From Kenny Burrell to “Brother” Jack McDuff, there are so many great recordings to choose from!
But Wes Montgomery takes the cake for me. One of my all-time favorites from the Wes Montgomery guitar blues recordings is No Blues, from his album Smoking at the Half Note:
https://www.youtube.com/watch?v=B4qLD3c2rGA
Listen to the recording as much as you can. Listen to it as you’re driving, washing the dishes, or hey – even in the shower!
(I use a portable Bluetooth speaker for this. Remember kids – electronics and water don’t mix…)
As you get more familiar with the tune, sing some lines along with the recording. Also, listen to how the Wes Montgomery guitar solo builds and what he uses to create tension.
Here’s the deal:
Listening is underrated, but it’s extremely important – it’s an excellent way to train your ears.
The best part?
You can do it anywhere. You don’t need to be at your guitar to listen to a recording!
Listening attentively to a great recording is, in many ways, just as good as practicing guitar.
Having said that, it’s time to crank your amp and grab your axe – let’s get playing!
Step 2: Comping
Comping practice is put on the backburner by many jazz students, but this is the thing you should do first when you get your guitar in your hands on a new tune.
Comping establishes the harmony in your ears, giving you the opportunity to get used to the sound of the chart without having to focus too much on soloing.
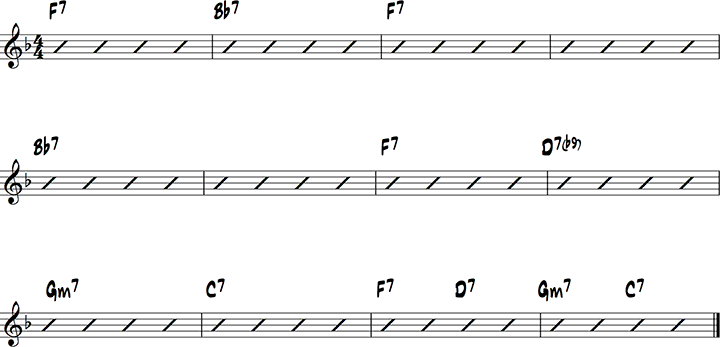
Here’s the chart for a standard jazz guitar blues in F, of which the changes to No Blues is based on:
Backing Track (slow):
Backing Track (fast):
I think you’ll have fun with this:
Below are a few chord shapes I enjoy using over a jazz guitar blues. I borrowed these from the great Canadian jazz guitarist Ed Bickert.
Many guitarists only use standard barre chords for comping, which can sound a bit too plain for jazz.
Once you get used to these voicings, you’ll find them very useful because they’re easy to move around the fretboard – and sound great!
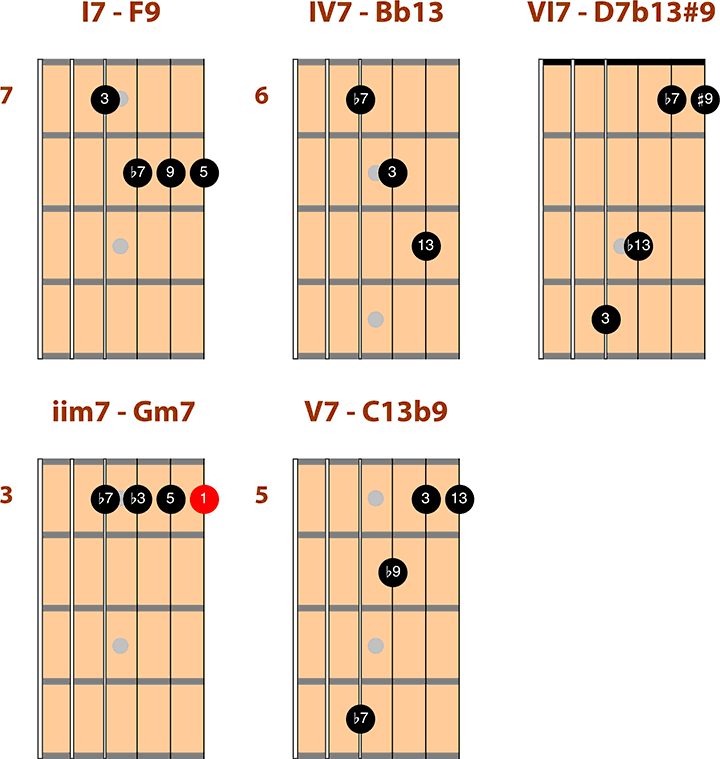
Exercise: Comp using the chord shapes along with the backing track below.
Bonus Challenge: Start to embellish the chord shapes as you comp as the video demonstrates.
Video Example
Backing Track:
Step 3: Learn the Melody
The melody is the DNA of the tune.
You can often find loads of great soloing ideas right inside the melody line.
I don’t think I’ll write the melody for No Blues out for you here because it’s a pretty easy one to figure out. Have a go at learning it!
Exercise: Learn the melody to No Blues from the Youtube recording above (the melody is located from 0:05 to 0:22 on the video)
Bonus Challenge: Play a solo using the melody as a basis. Vary the melody little by little until it ‘morphs’ into your own solo.
Step 4: Play Arpeggios Over the Chord Progression
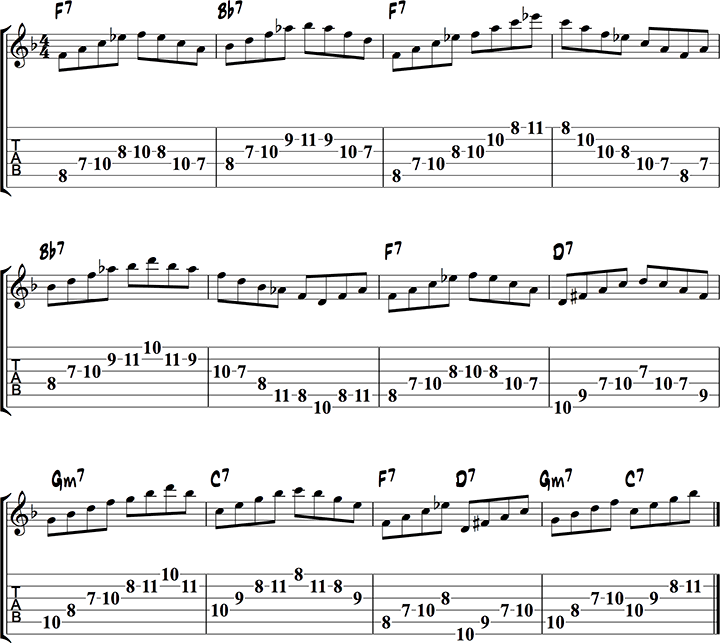
A good first step to learning to improvise over the tune is to work on arpeggios over the changes.
This will quickly get the sound of the harmony in your ears, and will give you a sense of the chord tones you should be focusing on when you improvise.
Exercise: Have a go at this arpeggio exercise below at a steady tempo.
Bonus Challenge: Make up your own arpeggio exercise on-the-fly over the backing track.
Listen & Play:
Backing Track:
Step 5: Analyze the Harmony and Determine Scale Choices
Now that we’ve sorted out the arpeggios, let’s now look at the chord progression and analyze it to see what scales you should apply over each chord.
It’s important to analyze the harmony so you get a better sense of what the chord changes are doing. This will give you a bigger palette of ideas to draw from in your improvisations.
To explain the scale choices I’ve applied here is a whole other article in itself. So, in a nutshell, here are the standard jazz guitar blues scale choices you would use over a jazz blues:
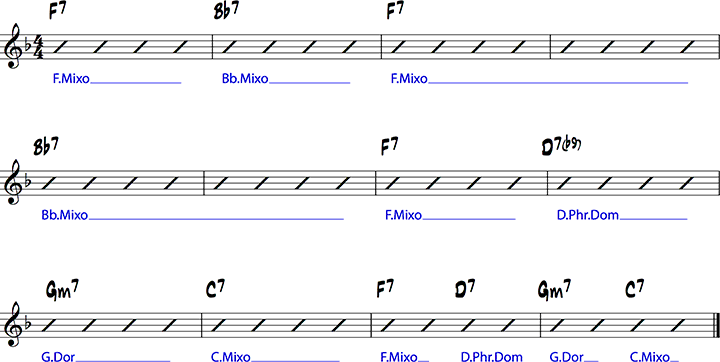
(Note: ‘Mixo’ = Mixolydian, ‘Phr.Dom’ = Phrygian Dominant, ‘Dor’ = Dorian)
Here’s where the scales would lie on the fretboard:
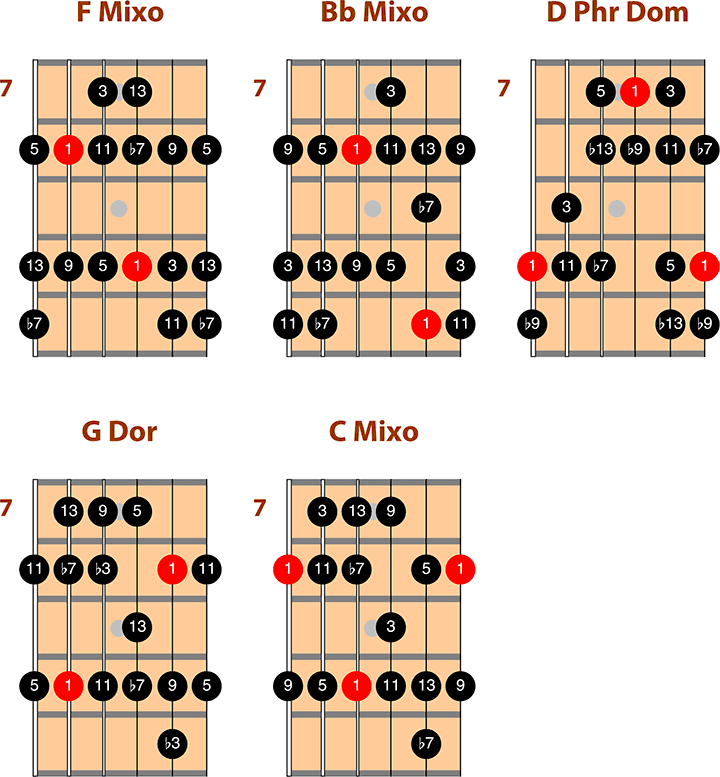
Exercise: In the same vein to what you did with the arpeggios, have a go at the following scale study over the backing track – keep each new scale shape in your mind’s eye as you play.
Bonus challenge: Invent your own scale exercises on-the-fly over the backing track.
Listen & Play:
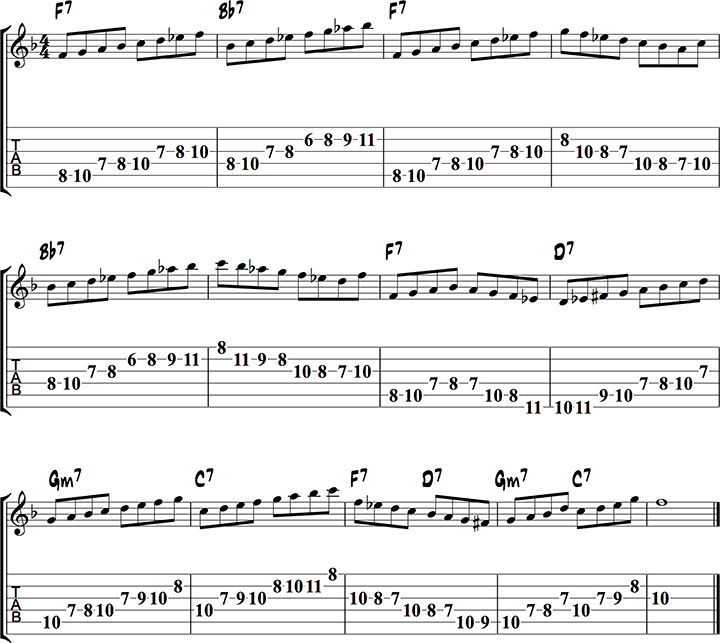
Backing Track:
Now after all that, I have something to tell you.
You’re going to hate me for this…
None of what you’ve practiced so far will actually help you sound like you’re playing jazz.
Instead, you’ll sound like you’re running scales and arpeggios up and down the fretboard.
Boring!
Well then…why did we bother learning the scales and arpeggios??
Let me explain.
Scales and arpeggios serve as a kind of “canvas” for our solos – a secure foundation on the fretboard that you can relate to your ears, which makes soloing much easier later on.
OK – it’s time to actually to figure out how to start sounding like a real jazz guitar blues player…
Step 6: Transcribe Wes Montgomery Guitar Blues Licks
A lick is a short musical phrase that relates to a set of chord changes.
Learning licks is the bread-and-butter of any jazz player’s time spent in the woodshed.
By learning, memorizing and studying licks, you’ll have a varied palette of sounds to choose from when you improvise, and you’ll start to sound like an authentic jazz player.
Exercise: Below are a few licks that are in the style of what is in the Wes Montgomery guitar blues solo from No Blues. Have a go at playing them!
Bonus challenge: Try to transcribe 5 other licks off the Wes Montgomery guitar solo and write them down in notation or TAB.
Listen & Play:


(For more great Wes Montgomery licks, check out this post by Fundamental Changes author Simon Pratt).
Now that you’ve learned these licks, have some fun with them.
When learning new licks, here’s some great exercises to get them into your playing:
- Memorize the lick until you can play it with your eyes closed.
- Practice a couple of scale positions, different octaves, and different keys.
- Play the backing track on and play the lick wherever you can in the chart.
- Once you’re comfortable with this, start to vary the lick. Try different rhythms, starting on different beats, varying the notes, etc. Eventually, ‘morph’ the lick into your own ideas that still feature some of the concepts of the original lick.
- Finally, improvise on the backing track with the scales and arpeggios as you were doing before, but this time including the lick and variations of it here and there as you solo.
Exercise: Licks 1, 3 and 4 are great blues scale licks, that will work anywhere over the chord changes. So put the backing track on and have a go at inserting them, cut-and-paste style, over the changes.
Bonus challenge: Licks 2 and 5 are lines over a specific set of changes. Try to insert them on the relevant chords.
Backing Track:
Step 7: Derive Concepts From the Licks
Analyzing licks is an important step, especially if you are new to the jazz style.
By investigating the nuts and bolts of how licks function, you’ll have a powerful method for building your jazz vocabulary, and you’ll start to develop your own voice as a soloist.
Bottom Line:
If you don’t analyze licks, it will be difficult to develop your own sound, and you’ll end up endlessly running the same licks up and down the fretboard.
As an example, let’s have a look at the last lick from the Wes Montgomery guitar blues solo in detail and see how it’s constructed:
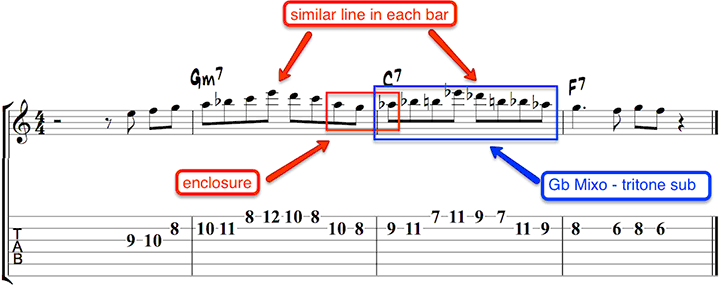
There are some useful concepts contained in this lick:
Enclosures:
These are one of the most commonly used devices found in jazz solos. They give a great chromatic sound and are characteristic of jazz bebop in particular. Here’s an example:
Listen & Play:

Exercise: Practice applying enclosures to notes as you solo over the backing track.
Repetitive contour of the line:
This lick is interesting as it repeats the same contour in bars 2 and 3.
So a concept that we could use for our own solos is to: repeat the same melodic contour over successive bars.
Exercise: Experiment repeating the general contour of a line whilst varying the notes.
However, I think the concept that is outlined in blue on the diagram is the most interesting:
Tritone Substitution:
Tritone substitution is one of the most important soloing concepts in jazz.
In this part of the lick, the C7 Mixolydian scale has been substituted for a Gb Mixolydian scale, the tritone equivalent. This gives a great outside sound to your solos when playing over a V7 chord, yet it still resolves smoothly to chord I.
(What’s a Mixolydian scale you ask? Check out this post by Joseph Alexander).
So, the concept we can derive here is On a V7 chord, you can substitute any Mixolydian scale with the Mixolydian scale of its tritone equivalent.
Exercise: Experiment with the part of the lick that is played over the C7 (outlined in blue). Take note of the underlying Gb Mixolydian scale shape and make up new lines based on this scale pattern.
Step 8: Let Go and Play some Guitar Blues!
“Master your instrument, master the music, and then forget all that bullshit and just play.” – Charlie Parker
So far, you’ve created a type of “scaffold” for your improvisation.
If you just improvise without having anything to work with first, that’s where improvising can be overwhelming. It’s like having a big, white, blank canvas, with nowhere to start.
So, by listening, analyzing and practicing scales, arpeggios, and licks as you’ve done, you now have a strong foundation for creating your own solos.
That’s the key – your own solos. All the above has just been some starting points.
I can’t emphasize this enough:
In the end, jazz guitar blues is at its finest when players are coming up with their own original spin on a tune spontaneously in the moment, rather than merely playing lines they have learned off recordings.
After you’ve familiarized yourself with the above exercises, spend some time in your practice session just letting go and messing around on a tune, playing whatever your ears are telling you.
This is when jazz becomes really enjoyable, and the creative side of your mind can be let loose.
Exercise: Improvise by simply following your ears and being spontaneous over the backing track. Just have fun!
Video Example
Backing Track:
Conclusion
So there you have it – you’ve been on quite a journey.
Well done for getting through all the steps! You’ve gone from the basics of knowing a jazz standard, all the way to being able to play the jazz blues with finesse and getting that classic Wes Montgomery guitar sound into your solos.
As you can see, learning jazz guitar blues doesn’t need to be difficult.
By breaking your practice up into a series of steps and focusing on them one at a time, you can be much more confident on the bandstand when a tune like this one has been called.
Before you go…
As my special gift to Fundamental Changes readers, I invite you to download my free eBook, Chord Melody Guitar Basics.
This 43 page eBook is a quick start guide on how to get up and running with chord melody guitar step-by-step. It includes sample chord melody arrangements, audio and video examples and backing tracks.
Click here to download your free copy of the Chord Melody Guitar Basics eBook!
Special thanks to Joseph Alexander of fundamental-changes.com for giving me the opportunity to write this post.
I wish you well in your jazz guitar journey. Happy soloing!
“The artists you work with, and the quality of your work speaks for itself.”
Tommy Emmanuel
© Copyright Fundamental Changes Ltd 2024
No.6 The Pound, Ampney Crucis, England, GL7 5SA
